Welcome to the latest in our highly popular series of beginner's guides, today, we'll be looking at Intel's newly released Sandy Bridge platform using the P67 chipset. As always, we'll be taking a no-fuss approach to getting the best from your new system.
Intel has both cursed and blessed us overclockers with the Sandy Bridge platform, on one hand, they have given us unlocked, and highly overclockable K series CPUs, but on the other hand the rest of the the CPUs have a fixed multiplier - all is not lost though, if you have a locked non-K series Sandy Bridge processor, we can still squeeze a few extra drops of power out of it, so please read this guide and it will branch you off in the right direction at the appropriate time!
Some people have commented that overclocking is so easy on Sandy Bridge, that a guide isn't required, well, I agree that you can get some fairly high overclocks using the one touch software, or BIOS settings, however, beware, when using things like that, because, although your Vcore (CPU voltage) may look nice and low at idle (0.9v or less), under load, it can be hitting 1.6v or more - Using this guide, you will reach the same, speeds and higher, but with lower voltage, where possible.
The test set up is as follows:
- Asus P8P67 Deluxe
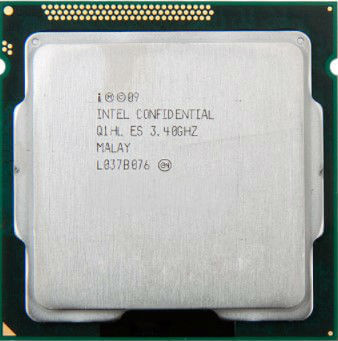
- Intel i7 2600K
- G.SKill Ripjaws X 2133MHz Kit, running @ 1600MHz 8-9-8-24
Before we go any further, it is important that you read the following paragraph:
So, what are we doing and why?
Well, we are going to take your 2600K from its standard 3.8GHz speed and run it as fast as it'll go with 1.35v Vcore*. This increase in speed can make your day to day tasks run quicker and any number crunching such as folding or video encoding or even Photoshop processing should be more fluid and less time consuming.
You may find that your CPU requires more or less voltage than the one I'm using, it really is impossible to predict, until you actually start to overclock it, so if it isn't stable using the voltages that I use, try a little higher and then test again.
If you are using an i3 or i5 processor, you will most likely find that you need less VCore than I use for my i7 2600K, and if this is the case, simply adjust accordingly.
Why 1.35v Vcore?
The Sandy Bridge PCUs are made from a 32nm process, which means that they are made up from a thinner slice of silicon, in theory means that the more voltage and heat you run through them, the more susceptible they may be to degradation over time, when comparing them to their 45nm and 65nm predecessors, so we want to keep this to a minimum.
We will not be going for extreme overclocks, that's not what this guide is about, we will be looking for an easily sustainable, 24/7 overclock with as little voltage as possible. If it's extreme overclocking you want, you shouldn't be needing a guide.
Things to know before we get started.
Cooling, Coolers, Airflow And Thermal Pastes.
Sandy Bridge CPUs tend to run much cooler than their predecessors, but as you overclock them, and add extra voltage, they can start to get a little toasty, so for any kind of overclocking, I always recommend a good quality CPU cooler - There are lots of great coolers out there and rather than fill up this guide with recommendations.
Along with your cooler, you'll need some thermal paste. I tend to use Arctic Silver Ceramique as it is non conductive and performs well.
Good air flow through your case is essential. If you don't have some kind of circulation of fresh air, your system is going to overheat - We don't want that as excessive heat can cause instability and shorten the life of some components. If you have a lot of messy wires, it's worth spending a few minutes tidying them up and holding them in place with cable ties or velcro straps.
Power Supplies.
I can't stress to you enough, the importance of having a good quality power supply. I'm not saying that you should go out and buy the most expensive, or highest wattage unit that you can find, but what I am saying is to avoid the cheapest units. Always go for a brand you know, and if you are unsure, please ask for help, that's what we are here for.
Why do we need a good power supply?
You need a good PSU because it is the heart of your system. When you overclock any system, you start to draw a lot more power than you would on a stock system, if the PSU can't deliver the power that is demanded of it, it may fail - This is where the difference between a good quality PSU and a poor quality PSU may become apparent. A poor quality PSU, when it fails, will quite often take out other expensive components, such as your graphics card, or hard drives, or if you are really unlucky, your processor and motherboard. The bottom line is, get a decent PSU, you'll be glad you did.
Memory
Things have changed somewhat, regarding memory on Sandy Bridge. On previous platforms, when you increased the BCLK/FSB, you would automatically increase the memory frequency, so the chances were, that you'd either be under or over the rated speed for your modules.
Because the BCLK is "fixed" to 100MHz, the memory frequency that you choose in the BIOS, will stay the same, regardless of the overclock that you end up with (Unless you have a locked CPU, more on this later), and this is because you have adjusted the CPU's multiplier, instead of the BCLK, this should all become less confusing as we progress through the guide, but in short, Sandy Bridge offers the following memory frequencies which are selectable, regardless of the CPU speed, but be aware that selecting the top two whilst running the CPU very fast, will require some extra tweaking, and we will look at that in a separate article or add on to this guide:
- 800MHz
- 1333MHz
- 1600MHz
- 1866MHz
- 2133MHz
- 2400MHz (This one is for advanced users only)
As with past Intel platforms, there's not a massive amount of real world performance to be had from running the memory at super high speeds, so my advice, for the best balance between performance is to grab yourself a mid range 1600MHz kit with moderately tight timings, this should offer good flexibility when overclocking. Don't worry if you already have your memory, or can't afford a higher specced kit, the great thing about Sandy Bridge, is that you can set the memory and forget it, so even slower kits will work just fine. All you need to make sure, is that the modules are rated for 1.65v or less***.
***See the Troubleshooting and Info section further down for more information on voltages.
Please note that if you plan on a small adjustment of the BCLK on a fixed multi CPU (Non K versions), or even a K series CPU for that matter, then you may find that your memory doesn't quite fit into the designated frequency settings listed above, in this case, you'll just have to choose the setting closest to your memory, and use that. If in doubt, use the next lowest.
Please also note that there is no longer a 2000MHz memory setting on Sandy Bridge. If you have 2000MHz memory, you will need to use the 1866MHz setting.
Start with a stable system
First, update your BIOS to the latest stable version, if unsure what this is, please check the manufacturer's website for more details as this changes regularly.
Before you start overclocking, you need to make sure that your system runs 100% stable at stock speeds, grab yourself a stress testing program such as Prime95 (or whatever you prefer) and run it for an hour or so and hopefully you won't have any problems.
Software
You will need a few pieces of free software, I'll explain how to use these as we go:
- CPU-Z - This gives us slots of information about the speed and status of the system.
- Prime95 - We will be using this for stress testing only.
- RealTemp - This gives us a relatively accurate temperature reading for our CPU's cores.
There are plenty of other excellent, and free pieces of software that you can use if you prefer, LinX is a good stress tester, but be warned, it generates a massive amount of heat and stresses the CPU to the limit. Because of this, you don't need to run it for as long as you might do when running Prime95.
If you are using an Asus board as I am, then you can use AI Suite to monitor the temps, my testing showed that the figures reported in AI Suite were comparable to the ones reported in RealTemp and Aida64.
Overclocking Background and Theory
I'll keep this part short because this guide is aimed at beginners, but here's a quote from the original C2D guide:
Important Terminology
Before we start, here's a quick glossary of terms, you can also find out what many acronyms and key words mean by hovering your mouse over them too. I'll just cover the basics here.
- BCLK (Base Clock) - This is the main clock for the Sandy Bridge platform and it runs at 100Mhz.
- Multipliers (Multis) and Dividers - Sandy Bridge is different in that the base clock (BCLK) is 100MHz, and everything else, including SATA, PCIe, memory and so on are linked to the BLK, and also run at 100MHz, so adjusting the BCLK is possible, but you will find that just a few MHz can result in instability - This will vary from CPU to CPU. The point is, the only real divider, as such, is for the memory, and there are several settings available for different speeds of memory, more on this later. Multipliers play a large role in the overclocking of Sandy Bridge CPUs, as mentioned above.
- VCCSA/VCCIO - On previous platforms (P55/X58) we had the Uncore to describe any part of the CPU that wasn't the actual core, so this would be the memory controller, PCIe and so on, Sandy Bridge CPUs have a different architecture, and with that comes a whole new bucket load of acronyms, VCCSA is the voltage for the "System Agent", which in a nutshell, is the Sandy Bridge equivalent of Uncore. VCCIO is the I/O voltage for the memory controller. Adjusting the VCCSA and VCCIO voltages can help at higher clocks with higher memory speeds and tighter timings, more on this later.
- IMC - This stands for Integrated Memory Controller. On previous Intel platforms, the memory controller was on a separate chip known as the North bridge, but with the latest Lynnfield and Nehalem platforms, and now Sandy Bridge, the memory controller is now on die (on the CPU), hence the name IMC.
- Hyperthreading - This is a highly complex feature of Intel CPUs, but to simplify, if you have a four core processor with hyperthreading enabled, a compatible operating system will see the four cores plus four virtual cores. If you run software that can take full advantage of this feature, then it can provide some incredible processing speeds, however, the extra speed comes at the cost of increased power consumption and generated heat. Try with it enabled and disabled, you may also find that you need less Vcore as a result of disabling hyperthreading too.
- Turbo Mode - See the explanation below**.
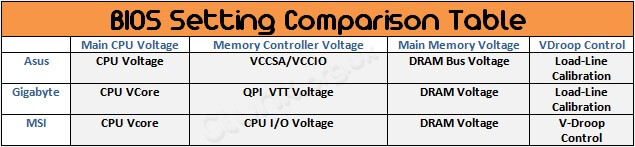
- Vcore - This is just another term for the main CPU Voltage, the name may differ for your motherboard (see the table below).
In the table below, I've listed the main settings that we will be changing during this guide and added a conversion to other manufacturers settings so that people can use the guide with other manufacturer's motherboards. I will add other manufacturers as I get hold of the boards and settings.
Calculating Your Processor Speed
Sandy Bridge is a completely new architecture, and with that comes a new set of overclocking rules and methods, however, the fundamental practice of overclocking remains the same, we will be adding voltages and raising frequencies to get us to our required clock speeds.
One of the main differences with the Sandy Bridge platform, is that the BCLK is locked, well actually, it isn't locked as such, but unlike previous platforms (P55, X58) where there was a 133MHz base clock (BCLK) with everything else, such as memory, SATA, running at a set ratio to that BCLK, Sandy Bridge has a 100MHz BCLK, and everything that is linked to it, also runs at 100MHz, so there is very little adjustment of the BCLK available. Intel's answer to this is to offer us CPU's with unlocked multipliers - In case you don't know what a multiplier is, I will keep it simple:
For Unlocked K Series CPUs:
- The unlocked CPUs have a selection of unlocked multipliers, ranging from 16 to around 57 (if you are lucky!).
- Your BCLK is fixed around 100MHz.
- So, your multiplier value (let's say 40 in this case) multiplied by the BCLK value (100 in this case) = your clock speed of 4000MHz (or 4GHz).
40x100 = 4000MHz. Got it?
Ok, so that is how we calculate our target clock speed. If we wanted to go for a clock speed, other than 4GHz, we would simply adjust the multiplier value to the appropriate value, for example 45 would give us 4500MHz (4.5GHz) and so on.
For Locked Multi CPUs.
- Unfortunately, the non K series CPUs only offer a very limited amount of overclocking headroom, and the amount that is attainable, will vary between CPUs, but from my own testing, up to 107 is doable.
- The way we work this out is very similar to the locked one:
- Using the example of 107 that I mentioned above, and the maximum multi available on our locked CPU which, including Turbo, is 38 (107x38), this gives us a clock speed of 4066MHz (4.06GHz).
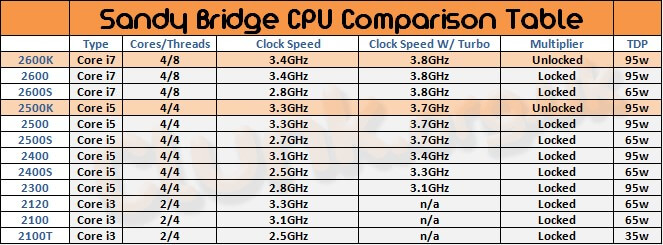
**Turbo mode is quite a complex feature, and the way we use it on Sandy Bridge for overclocking is quite different from before. A simple explanation of this would be that rather than overclocking the CPU's multi, we are actually overclocking the turbo ratio, so for example, our default clock speed is 3800MHz on our 2600K with Turbo, or 3400MHz without, so if we increase the Turbo ratio, we increase our maximum clock speed too - It's easy to work out, whatever figure you enter for the Turbo ratio, simply multiply that by the base clock value (which will be 100MHz) and that will give you your clock speed in MHz.
Keep all that in mind, the same rules apply when we are overclocking too.
Familiarise Yourself With The BIOS
When you start overclocking, it's important that you familiarise yourself with your motherboard's BIOS. Just spend some time getting to know some of the basics and this will help you when you move to the more advanced things later.
For the purposes of this guide, I'll assume that you know how to enter the BIOS, make changes and save and exit.
Next, getting started...